 Home
Home#1 Not creating a battle party:
Mistake: Without a battle party, significant time is lost trying to load each counter manually. Compared to an Ideal or Average rejoin time, this can cost between 7s to 21s of time over the full raid.
Rough DPS Loss: Initially ~3.5% → 8%, more for faster raids
Solution: Create a preset battle party for quicker rejoins. A preset battle party allows you to heal injured Pokémon and swipe directly to the intended counters before rejoining the fight.
- Potions & Battle Party: 6 → 7s
- Revive Potions & Battle Party: 7s → 8s
- No Battle Party: ≥ 15s
#2 Allowing Pokémon to faint
Mistake: Fainting triggers a series of time loss interactions which require a lot of backtracking to fix costing ~2.5s to ~7s per lobby.
Rough DPS Loss: 1% → 3.5% per rejoin.
- It triggers a 0.5s faint animation.
- It forces an auto-swap, 0.5s, to the first injured Pokémon in an earlier slot.
- The player must swap back to an intended attacker costing an additional 0.5s.
- Fainting also forces the use of revives adding 1.0s to rejoin times.
- Potential Total Time Loss: 1.5s+ per faint + 1.0s per rejoin.
Solution: Swap to the next attacker if the active attacker cannot meaningfully continue. This avoids the faint animation & the need to revive.
#3: Overprioritizing IV's & Levels
Mistake: Choosing an attacker with High IV's over an attacker with stronger movesets, base-stats and levels.
Rough DPS Loss: Varies but it can range above 30%
Short-term Solution: Pick counters with high attack stats & strong movesets. Compare them with rotation calculators, successful raid parties or perform trial and error.
Long-term Solution: Learn how IV's, base-stats, movesets and levels all relate to one another. [Future article in progress]
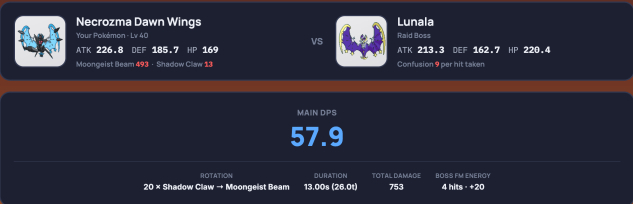
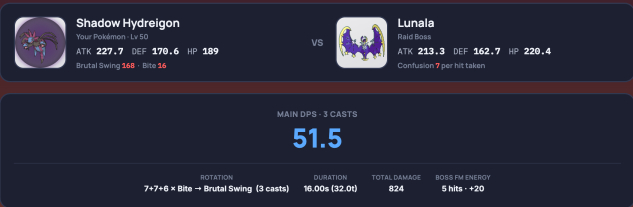
Movesets & Pokemon base stats are much stronger indicators of performance. Fig 3A compares the DPS of two pokémon, absorbing fast moves, over the first 100 energy. Picking the respective Shadow Hydreigon over Necrozma Dawn Wings is at minimum a 12.4% DPS loss. Results from Main DPS calculator (catch tank calc webpage)
Fig: 3A
- Level 40 Necrozma Dawn Wings (10/15/15)
- Level 50 Shadow Hydreigon (15/15/15)
#4: Adding "Filler" Pokemon
Mistake: A common fear with not having a full battle party is the # of rejoins needed to re-enter the raid. As a result players will add filler pokemon to maintain a full sized party of 6 thus sandbagging the DPS much lower than what is required.
Why is it a mistake: Fear of time-loss through rejoins stems from lag, not setting a battle party, or over relying on revives. Avoiding these issues seems intuitive at first but creates a detrimental set-back in both longer rejoins & poor performing battle parties.
Consider the screenshots above and suppose you have a party of 3 NDW. Adding a Shadow Hydreigon may save 1 rejoin, the equivalent of 4-6% DPS in terms of time save. However it'll also be a 12.4% DPS loss due to lack of Necrozma Dawn Wings up time.
Solution: Do not add filler Pokémon, trust in your primary carries, plan around a fixed # of rejoins.
First define how many rejoins this raid challenge will require for your base strategy. Then, optimize your active DPS time with the strongest possible DPSers. Here is a sample breakdown of timing your rejoins.
- 4 rejoins means relobbying at ~(240s, 180s, 120s, 60s)
- 3 rejoins means relobbying at ~(225s, 150s, 75s)
- 2 rejoins means relobbying at ~(200s, 100s)
- 1 rejoin means relobbying at ~(150s)